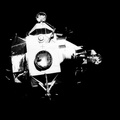
 was photographed from the Lunar Module/Command Module (LM/CM) following SM jettisoning. As seen here, an entire panel on the SM was blown away by the apparent explosion of oxygen tank number two located in Sector 4 of the SM. Two of the three fuel cells are visible just forward (above) the heavily damaged area. Three fuel cells, two oxygen tanks, and two hydrogen tanks are located in Sector 4. The damaged area is located above the S-Band high gain antenna. Nearest the camera is the Service Propulsion System (SPS) engine and nozzle. The damage to the SM caused the Apollo 13 crew men to use the LM as a lifeboat. The LM was jettisoned just prior to Earth re-entry by the CM.")
WIKIARCHIVES.SPACE
The Human Spaceflight Archive


Information
- Taken in
- Space
- Author
- NASA
- Description
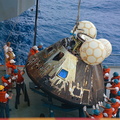
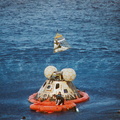
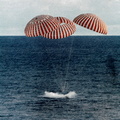
- This view of the severely damaged Apollo 13 Service Module (SM) was photographed from the Lunar Module/Command Module (LM/CM) following SM jettisoning. As seen here, an entire panel on the SM was blown away by the apparent explosion of oxygen tank number two located in Sector 4 of the SM. Two of the three fuel cells are visible just forward (above) the heavily damaged area. Three fuel cells, two oxygen tanks, and two hydrogen tanks are located in Sector 4. The damaged area is located above the S-Band high gain antenna. Nearest the camera is the Service Propulsion System (SPS) engine and nozzle. The damage to the SM caused the Apollo 13 crew men to use the LM as a "lifeboat." The LM was jettisoned just prior to Earth re-entry by the CM.
- Created on
- Friday 17 April 1970
- Albums
- US SPACE PROGRAM / APOLLO / APOLLO 13 / Mission Photos (Edited)
- Source link
- https://www.flickr.com/photos/nasa2explore/9351248797/in/album-72157634763368953/
- Visits
- 231
- Rating score
- no rate
- Rate this photo
- License
- Public Domain
- Modified by WikiArchives
- No (original)
- Downloads
- 0
Powered by Piwigo